
Why Every Business Needs an accounting@ Email (and How to Set It Up in Google Workspace)
A vendor emails a bill to the founder’s personal inbox. A customer sends a remittance to someone who left in March. The bank’s statement notice goes to whoever opened the account in 2021. Then, at month-end, your accountant asks: “Can you forward me…?”
Almost every bookkeeping delay we see starts here. Not with the accounting, but with the mail. The fix takes about ten minutes: one shared address, accounting@yourcompany.com, that every bill, invoice and statement goes to, with the right people (including your accountant) on it.
This guide covers why it matters, how many addresses a small company actually needs, and exactly how to set it up in Google Workspace.
What a Google Group is (and why it costs nothing)
A Google Group is an email address that delivers to a list of people. Mail sent to accounting@ lands in each member’s own inbox, and the group keeps a searchable archive of every conversation.
Groups don’t need a Google Workspace license, so you are not paying for another user. And because nobody logs in “as” accounting@, there is no shared password passed around the office.
Why every company needs one
- One address for everything financial. Vendors, customers, your bank, your payroll provider and the IRS all have one place to reach you. Nobody has to guess who handles billing.
- It survives turnover. When someone leaves, the address stays. You remove them from the group, add their replacement, and the history is still there.
- Your accountant sees things as they arrive. Bills, receipts and statements reach your books the day they come in, not when someone remembers to forward them at month-end.
- A record you can search. When a lender, an auditor or a tax notice asks about a payment from last year, the email trail is in one place.
- Finance stays out of personal inboxes. The founder stops being the bottleneck, and a bill never gets buried under everything else.
- Fake invoices are easier to spot. When all bills arrive in one place and more than one person sees them, a lookalike invoice or a “new bank details” email stands out.
- It connects to your tools. Many bill-pay and expense tools give you their own inbox address for documents. Add it as a member, and every bill sent to accounting@ goes straight in.
One address, or ap@, ar@ and payroll@?
Larger finance teams split their mail: ap@ for bills, ar@ for customer payments, payroll@ for payroll. At a smaller company, that just means three places to check.
Our recommendation:
- Start with one group, accounting@. Everything goes there.
- Add aliases instead of new groups. If customers already know billing@ or invoices@, add those as aliases of the same group. Every address works, and it all lands in one place.
- Split when the people split. Once different people actually handle bills and collections, create ap@ and ar@ as separate groups.
- Keep payroll separate once you have employees. Pay stubs and salary details shouldn’t reach everyone on accounting@. A small payroll@ group with just the people who need it is the safer setup.
Why add your accountant to the group
Your accountant doesn’t need a login to your company, a license, or admin rights. They are added as an external member: their own email address, on your group, receiving what the group receives.
- Bills and statements reach your books without you forwarding anything.
- Questions get answered from the original email, not from memory.
- The month closes faster, because nothing is waiting on your inbox.
- You stay in control. Removing them takes one click, and nothing else in your Workspace changes.
How to set it up in Google Workspace
You’ll need to be a Google Workspace administrator for your company. It takes about ten minutes.
Step 1. Open Groups in the Admin console
Go to admin.google.com, then Directory → Groups, and click Create group.
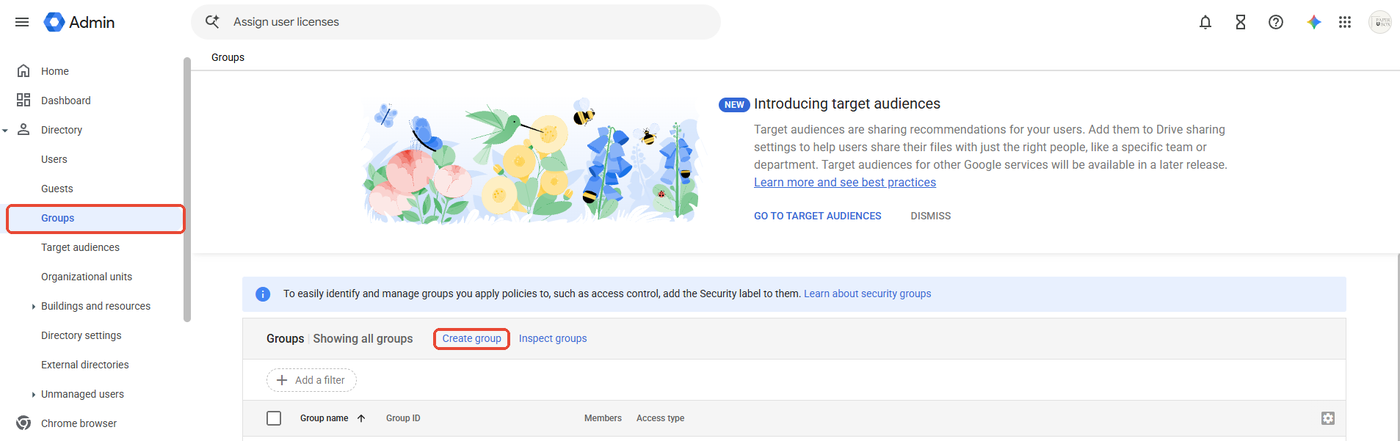
Step 2. Name the group and choose its address
- Group name: Accounting
- Group email: accounting, at your company’s domain
- Description: something like “Official accounting and finance inbox for invoices, billing, statements, and bookkeeping support.”
- Group owners: you, or whoever runs operations. Keep owners inside your company; your accountant is added as a member later.
- Labels: leave Mailing checked. You don’t need Security for this.
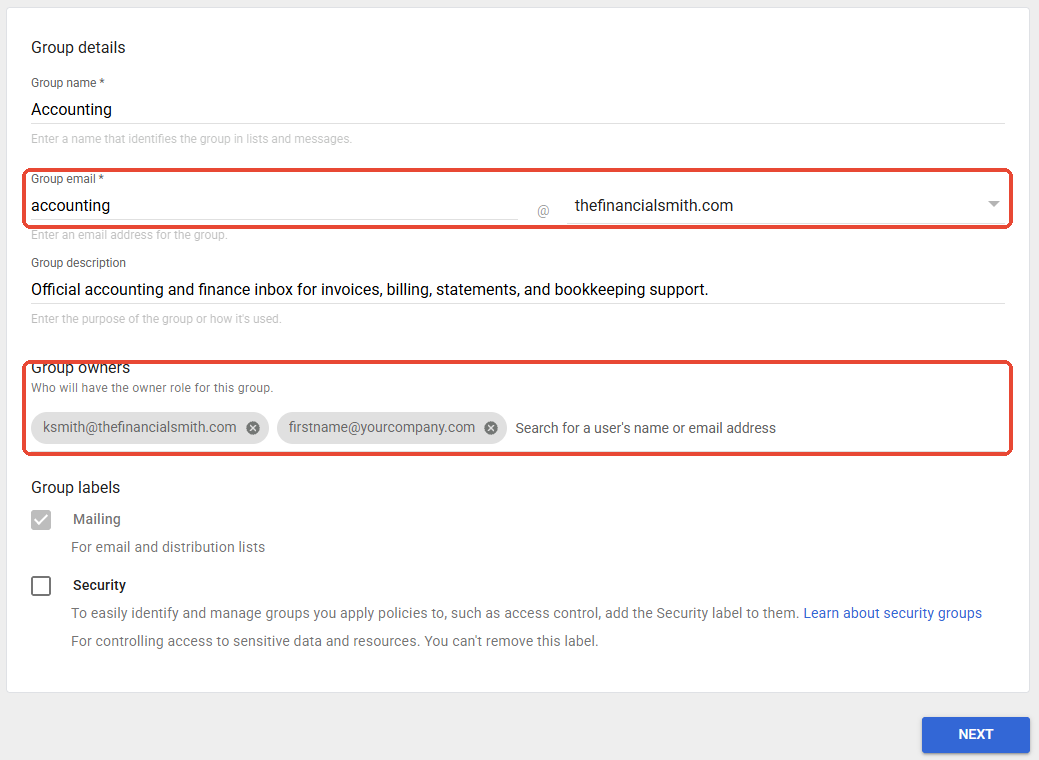
Click Next.
Step 3. Decide who can see and who can send
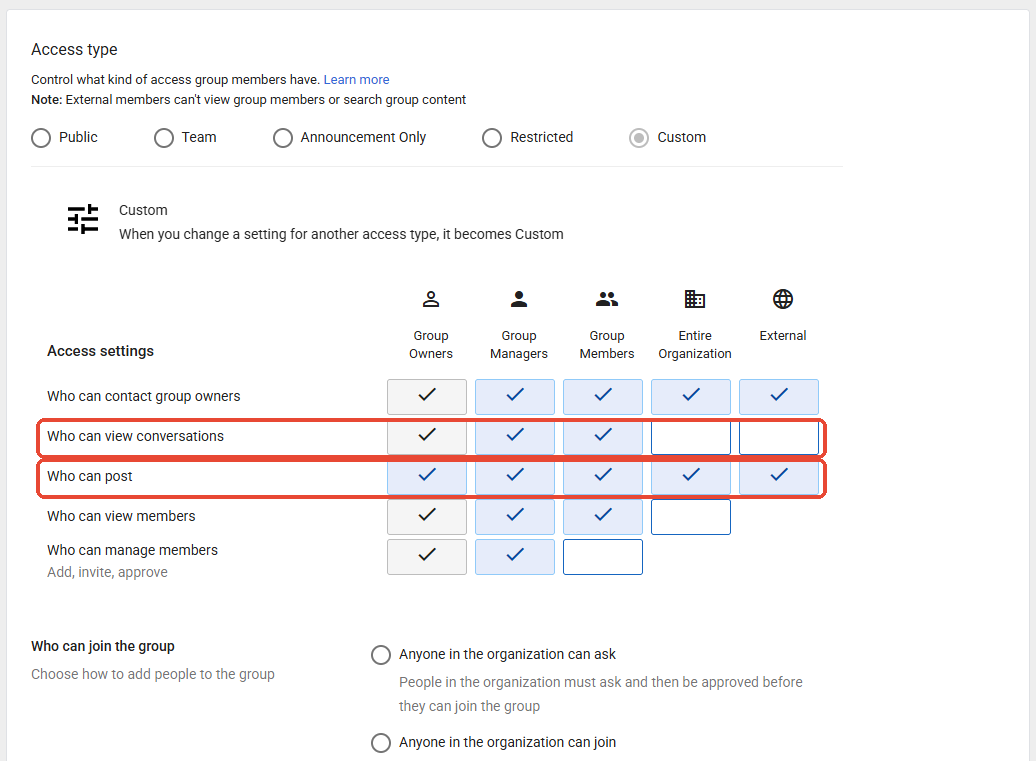
Choose Custom and set the access settings like this. The two rows that matter most are highlighted:
- Who can view conversations: owners, managers and members only. Leave Entire organization and External unchecked, so the rest of the company and the public can’t browse your finance mail.
- Who can post: check every box, including External. This is what lets vendors, customers and your bank email the address. Without it, their emails bounce.
- Who can view members: owners, managers and members.
- Who can manage members: owners and managers.
Step 4. Lock down who can join, and allow your accountant
- Who can join the group: Only invited users.
- Allow external members: check Allow admins to add external members. This is what lets you add your accountant, who is on a different domain. Leave “Allow users to add external members” unchecked.
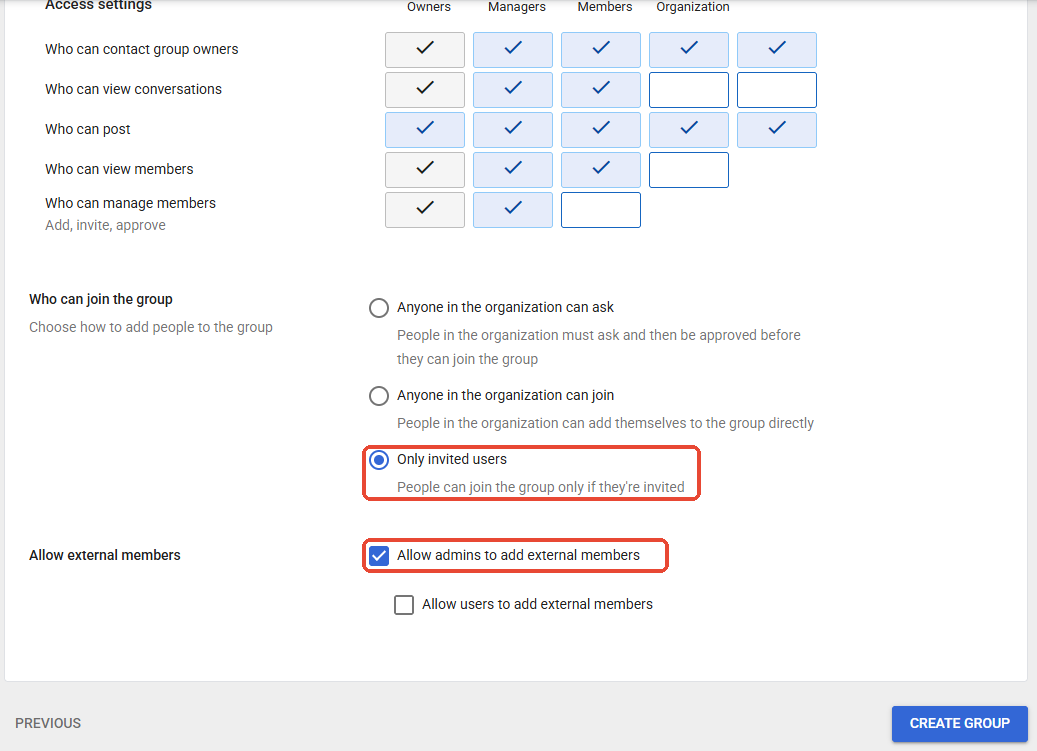
Click Create group.
Step 5. Add the people, then your accountant
Open the new group, choose Members → Add members, and add:
- Whoever pays bills and sends invoices at your company
- Your accountant’s email address, as a Member (not an owner or manager), with email delivery set to Each email
If Google won’t let you add an address outside your domain, check Apps → Google Workspace → Groups for Business → Sharing settings and make sure external members are allowed.
Step 6. Test it
From a personal Gmail account, send an email to accounting@ and confirm every member receives it, including your accountant. If it bounces, go back to Step 3 and check that External can post.
Step 7. Put the address to work
A group only helps if the mail goes to it. Update the email on file with:
- Every vendor that bills you, and every software subscription
- Your invoices to customers (the reply-to and the company email in your accounting software)
- Bank and credit card statement notifications
- Your payroll provider (or your payroll@ group)
- Tax and government accounts that send notices by email
- Your bill-pay or expense tool’s inbox, added as a group member
A few tips
- Reply as accounting@. Members can send from the group address: in Gmail, go to Settings → Accounts → Send mail as and add accounting@. Replies then come from the company, not from a person.
- Watch for spam. Because anyone can email the group, check its spam moderation setting so junk is held for review rather than delivered to everyone.
- Review the member list every quarter, and the day someone leaves.
Working with us
When you become a client, we’ll ask you to set up accounting@ and add the address we give you during onboarding as an external member. If you’d like help, we’ll walk through it with you on a call. It’s the single fastest way to get your books current and keep them there.